I want to build a camera. The wonderful thing about a hobby is that the directions it takes do not have to make sense. Sure, I shoot mainly digital but that is not the point, is it? I want to build a camera and experience for myself the trials and tribulations of early photography.
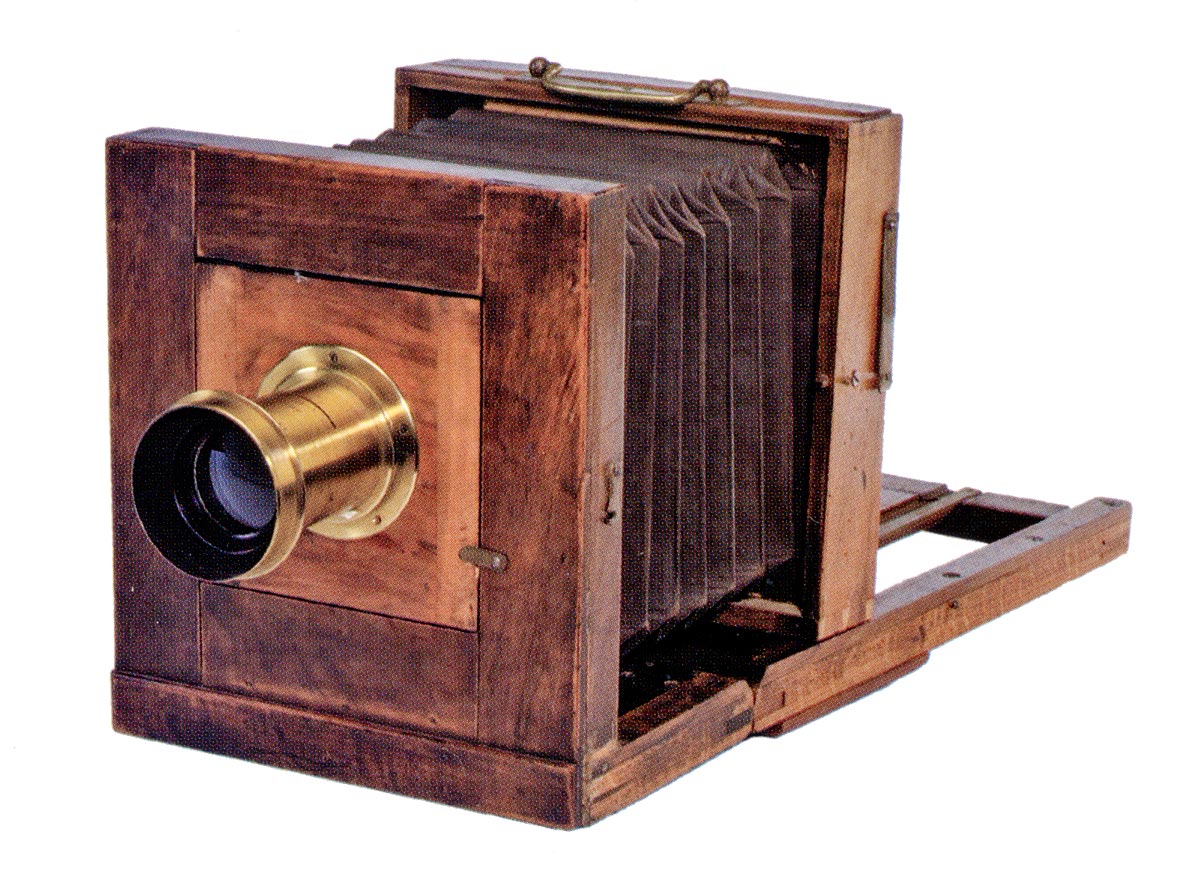
I think this camera below would suit admirably. It is made of wood, it is simple, and it is something I can handle in my somewhat primitive workshop. But that is not the subject of my current missive. My camera will need a lens.

This image of a Giroux Daguerreotype Camera from 1839 is taken from the book “500 Cameras” by Todd Gustavson. A totally wonderfull book and one I recommend.
And the subject of a lens brings us to an interesting story. When I developed my first roll of film it was 1959 and I really didn’t know much about the process. I did not fix the film correctly so the strip of negatives was mottled and milky white. I needed help to figure out what had gone wrong.
My girlfriend’s grandfather, Russ Doherty, had been a photographer in Peterborough, Ontario, around 1910 and so I took my film to him for advice. He laughed and explained that I had not fixed the film properly and told me to put it back in the fixer. I did as he said and the film cleared up just fine. I still have those negatives.
My girlfriend became my first wife a few years later and when her grandfather died the family inherited
three lenses from his photo studio. And because of my interest in photography they were passed on to me. This was in the 1960’s and they have lain in my boxes of camera stuff for these many years. They were all in similar condition and looked rather shabby. One, the largest, had a frozen aperture ring, one had no aperture ring at all but used drop-in brass apertures and the smallest, with aperture ring, seemed the most likely to disassemble easily. So I chose it for my camera project.
But first, I had to clean it up and see if it could take a decent picture. Now, I want to give a very strong caveat: it is a simple thing to ruin a good lens by trying to clean it up. If you have any doubt about what to do, then do nothing! These old lenses are rare enough without destroying another one.
My chosen lens looked pretty bad. The surface appeared to be brass but I had no idea how deep the corrosion was.
The glass was equally a concern. It was uncoated which was expected in a lens of this age. And it was dirty to put it mildly

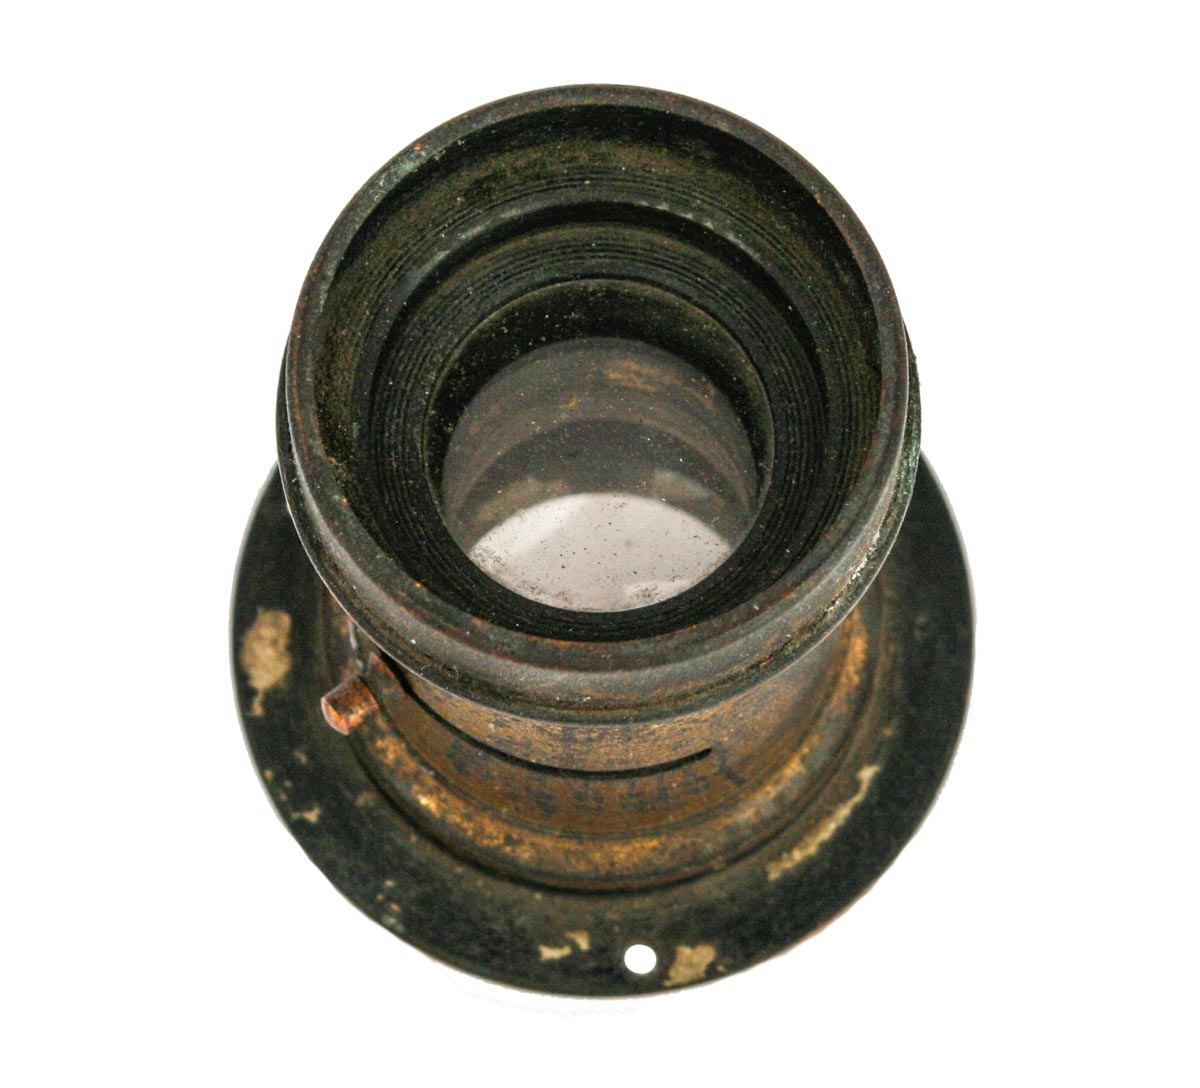
Looking at the exit lens you could see the accumulation of years of grim and dust on all surfaces all the way through the lens.
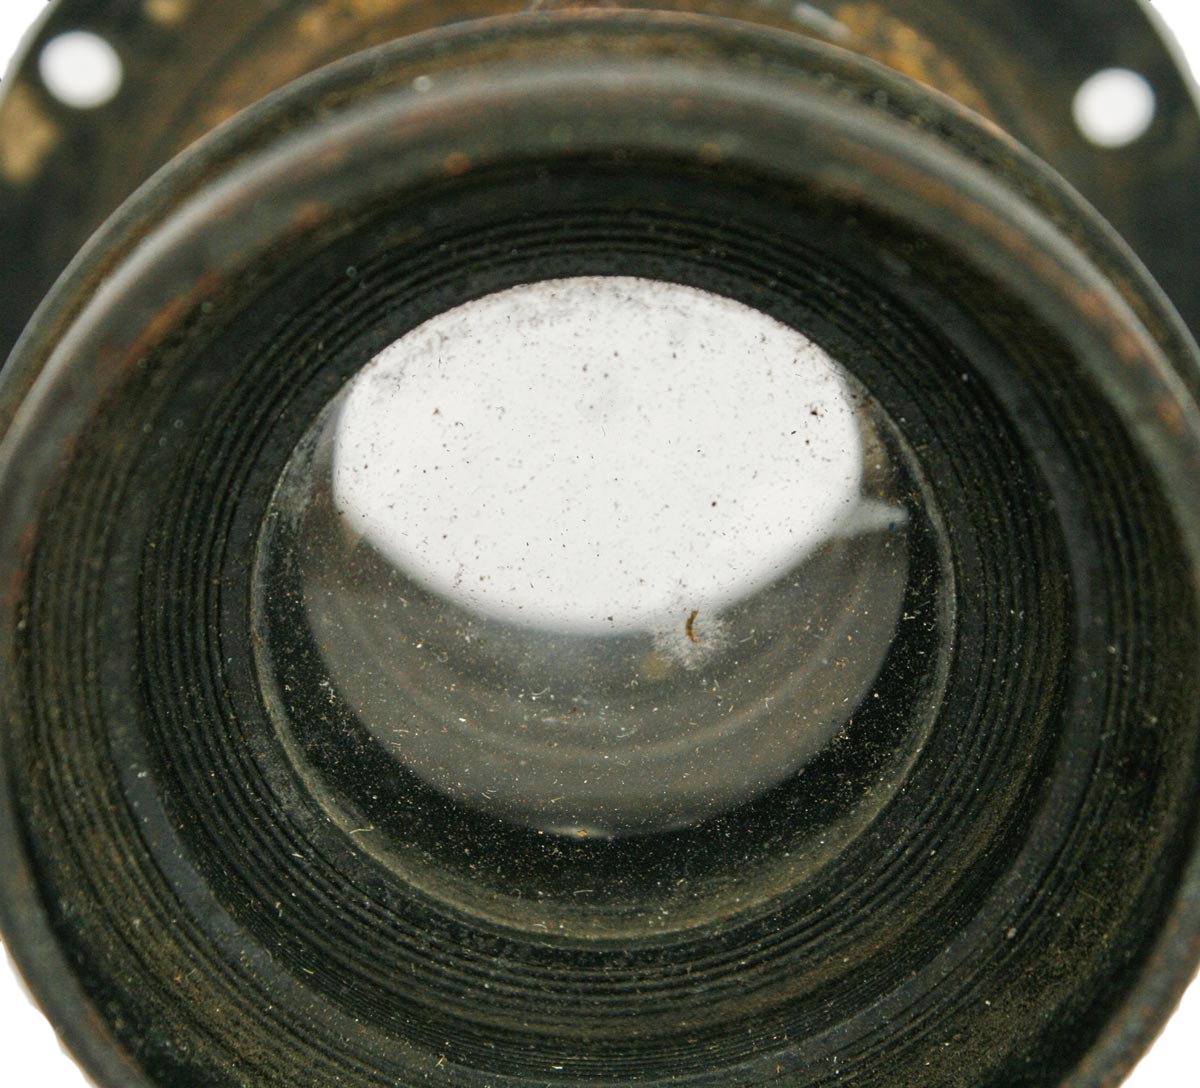
Looking in the front objective lens the fog and dirt was most apparent. And of course the outside of the lens was even worse. Could it be salvaged?
Disassembly proved to be straight foreword. The lens hood and front objective screwed out of the metal tube the lens was built in. On the rear the mounting ring came off easily and after some struggle the rear element screwed out leaving the brass tube containing only the iris diaphragm.
The iris was a primitive affair with the diaphagm blades working between two brass rings, one fixed and the other left to rotate. I removed these from the brass lens barrel. The corrosion had frozen them in place and I had to resort to light taps with a leather mallet but they came out without damage to any parts. This left the barrel empty. It was time to start cleaning.
I started with the lens barrel because I was anxious to see if the metal would clean up. Metal cleaners like Brasso had no effect whatsoever. That was not unexpected. Obviously I would need to use an abrasive. This was
a dangerous step. You want to clean the metal but you don’t want to change the overall dimensions of the piece and you don’t want to sand away any delicate engraving that might be present.
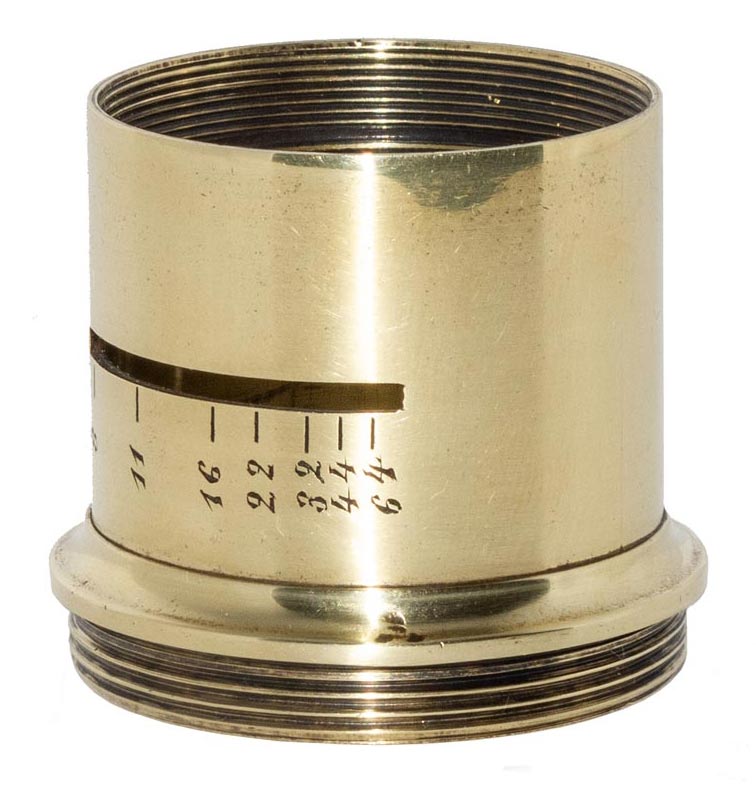
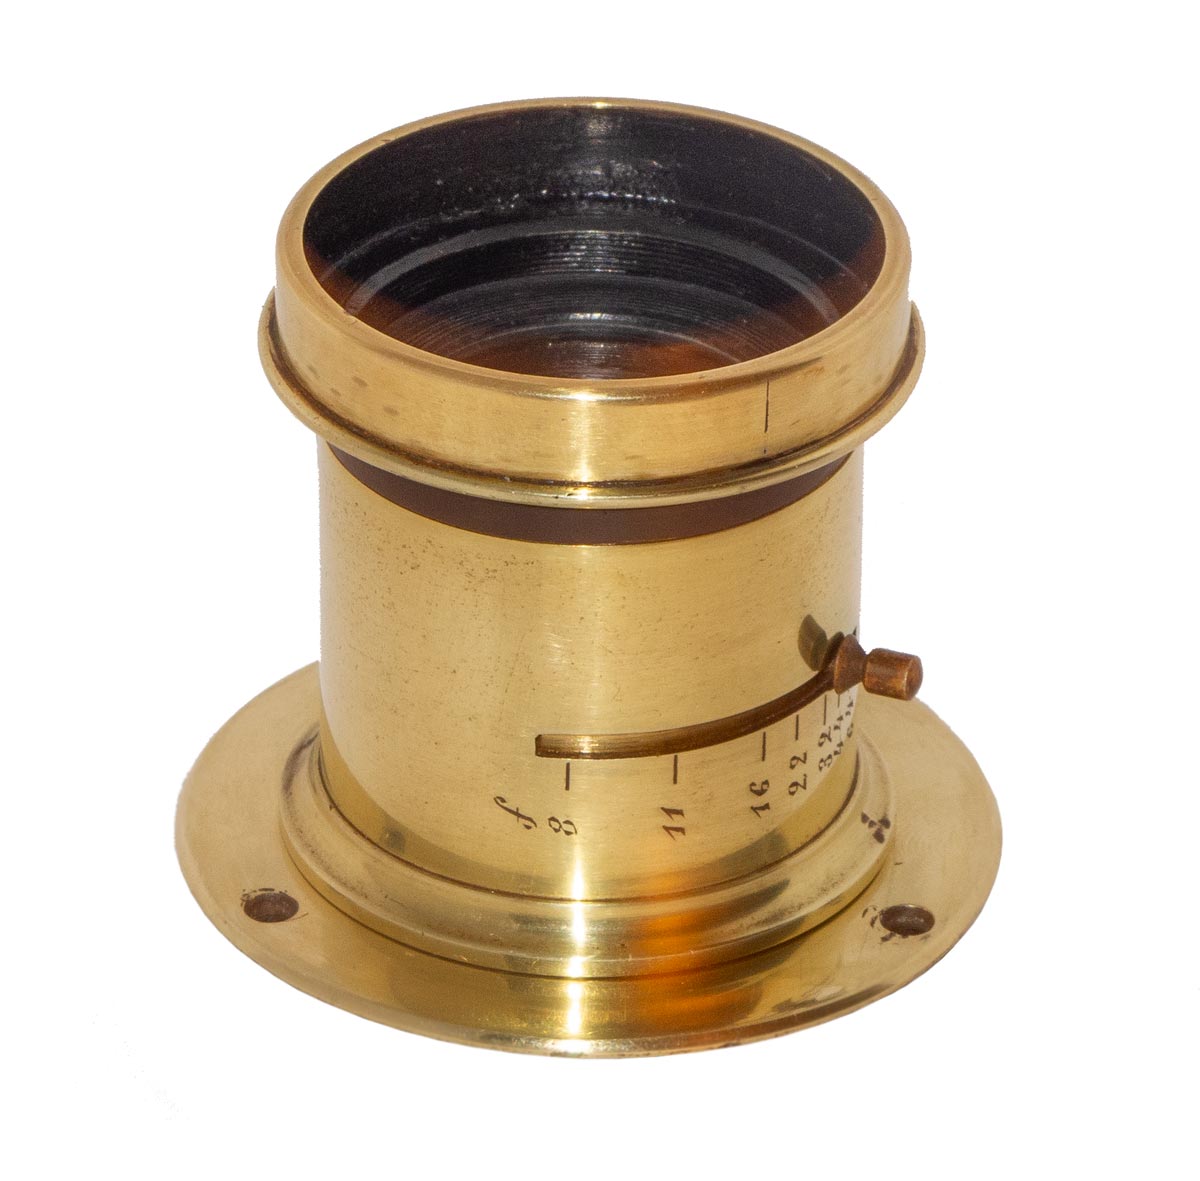
I began with a 600 grit sandpaper which is pretty fine and very gently went over the exterior of the lens barrel. To my surprise the surface corrosion came off and very quickly clogged the sand paper. To completely clean the exterior of the barrel took several small pieces of paper and a few hours of patient work. The brass came clean and bright and it was then I saw that the f/ stops, f/8 thru f/64, were beautifully carved into the brass. But nowhere was there any other marking on the lens. No makers name, no company name, nothing.
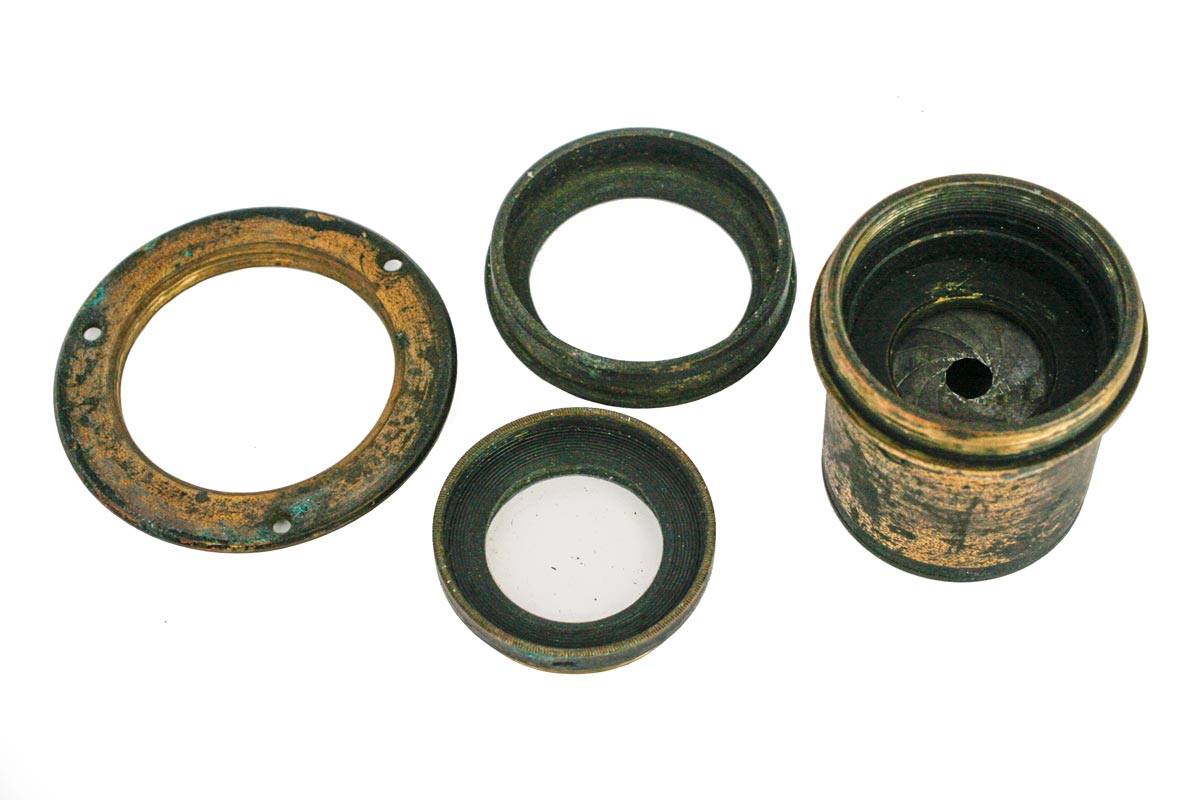
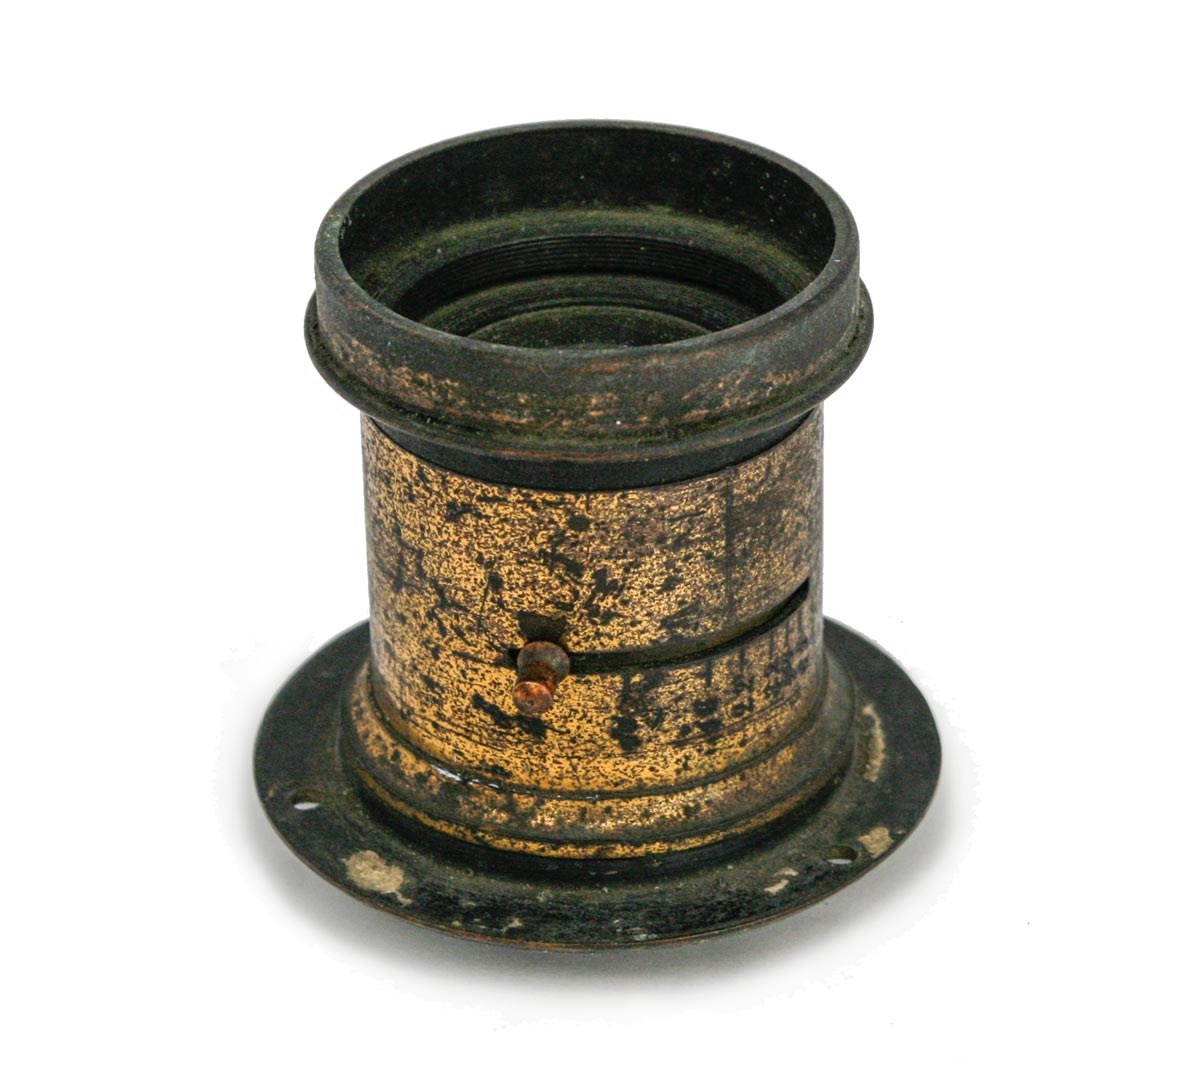
I removed the mounting ring which turned off easily. On the front was a small lens shade which gave me a little more trouble and the front and rear lens groups were really tough to remove. Here we see the condition of the interior of the lens. The iris was working but it was covered in dust and dirt.
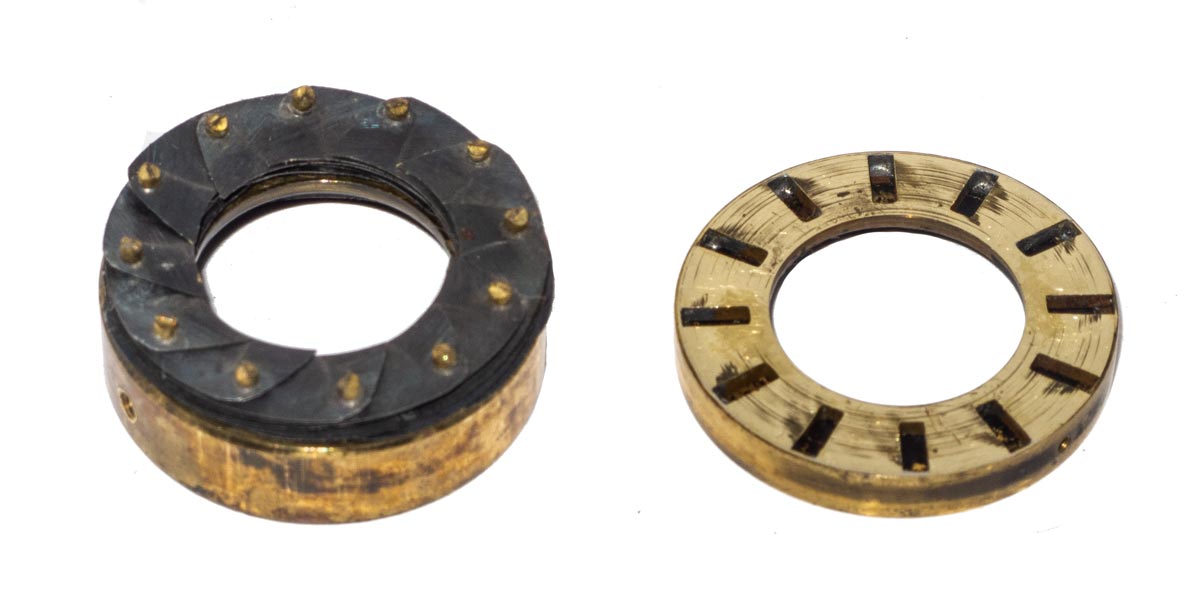
The iris consisted of two brass rings with the iris blades working between them as one ring rotated over the other. The brass was corroded and the iris blades were very dirty.

I cleaned the brass rings up a little and removed the iris blades one at a time being very careful not to bend them Distorted iris blades will not work.
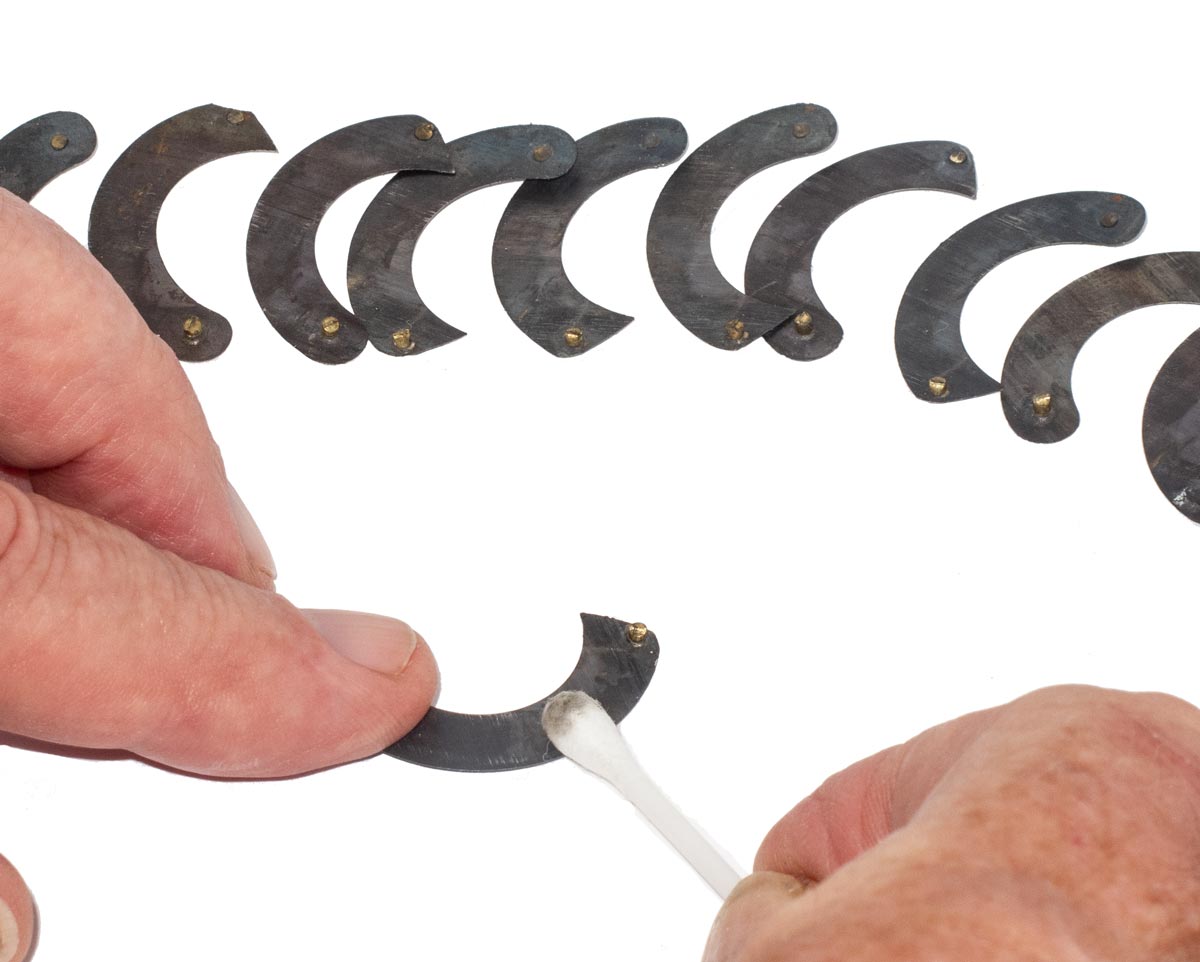
I took each blade in turn and cleaned it with a degreaser. It was then given a thin coat of oil.
When the iris came out of the lens barrel it came apart in my hands. There was nothing actually holding the assembly together except the tight fit in the lens body. The iris blades, all twelve of them, just lifted off the fixed ring. I did this very carefully because a bent blade would never work right again.
I cleaned up the two brass rings a little but I didn’t polish them because they are internal to the lens and it is enough that they move smoothly.
I was surprised that this corroded brass cleaned up so well. You can see that I have not damaged the delicate engraving of the f/ stop numbers on the barrel. In these restorations, gently does it. Really!
After the 600 grit I moved to 1000 and then 2000 grit papers which really brought up the brass. The final step was jeweler’s rouge on a cloth which gave the brass a mirror finish. Things were definitely looking up.
The mounting ring and lens hood got the same treatment and came up with the same beautiful brass mirror finish.
And lastly, I tackled the glass itself. There was a single group in each end of the barrel. At first I thought I was looking at a Petzval Portrait lens but neither end had an air separation between elements, which is a hallmark of the Petzval.. They were both cemented doublets. I thought maybe a double Gauss but again there was no air space in the groups. So I am pretty sure I was dealing with a Symmetrical Rapid Rectilinear lens which was a type developed in the 1860’s. These lenses had good distortion control and low Coma and Chromatic aberrations. But they had problems with spherical aberration, field curvature and astigmatism. As a result, they were limited to a maximum aperature of f/2.8 and improved
dramatically when stopped down. They were one of the major landscape and architectural lenses from the 1860’s to the 1900’s. Ultimately they were the basis for the Zeiss Protar of more recent fame.
I began thinking the glass would be the hard part but, no, it cleaned up real easy. I used a degreaser and then Windex with soft lens tissue and to my surprise the surfaces were really good. No serious cleaning marks or scratches. There were one or two very small spots that would not come off and a magnifier revealed that they were
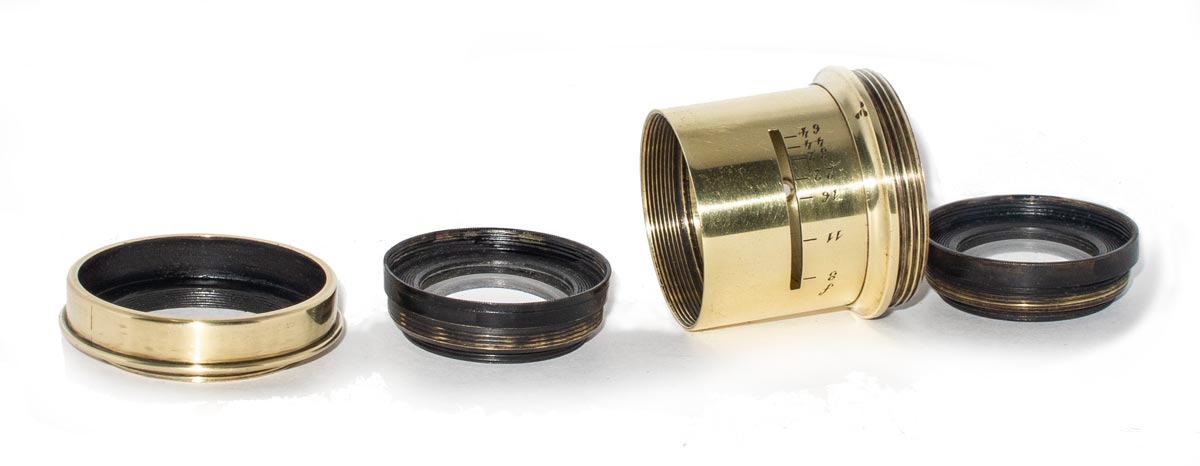
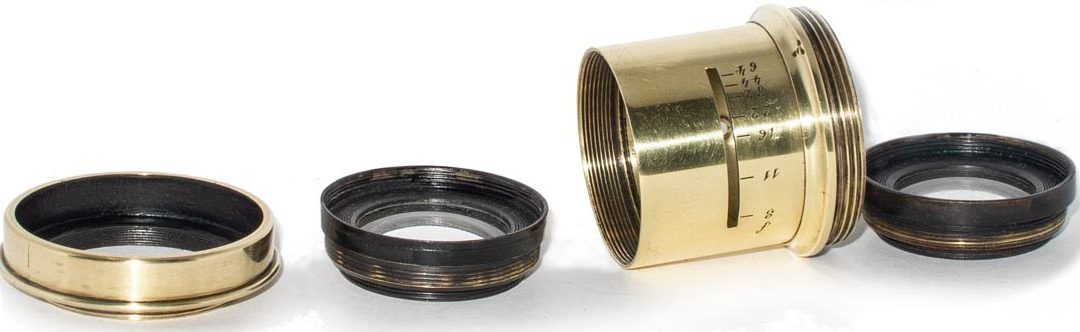
And here is our lens ready for assembly. From the left we have the little sun shade, the front element, the lens barrel and the rear element. The mounting ring is not in this picture.

The inner surfaces were not well painted and they had suffered some scrapes over the years. All of the exposed metal that might cause reflections inside the lens was painted flat black.
places where the lens had been hit and small chips taken out. But so small as to be invisible. And there was a small area where there was some element separation but, again, so small that it was easy to lose where it was.
The final step before assembly was to paint flat black into the surfaces around the two lens groups that could reflect light. This is especially important in these old uncoated lenses as there is a lot more stray light bouncing around.
The paint was left to dry for a week before assembly. I don’t know if that was necessary but I wanted the paint to dry thoroughly so that there would be no deposition of paint solvents onto the inner glass surfaces. I am not sure if it was necessary but I think it was a good idea not to take any chances.
Before
After!
And there it is. I am really pleased with how this turned out. My new old lens has been on my desk now for several days and I caress it regularly. A little weird, I know, but I love to make old useless things new and useful.
But we are not done. Will this lens be worth the effort of building a camera for it? Finding out just how good, or bad, this lens is will be our next task.
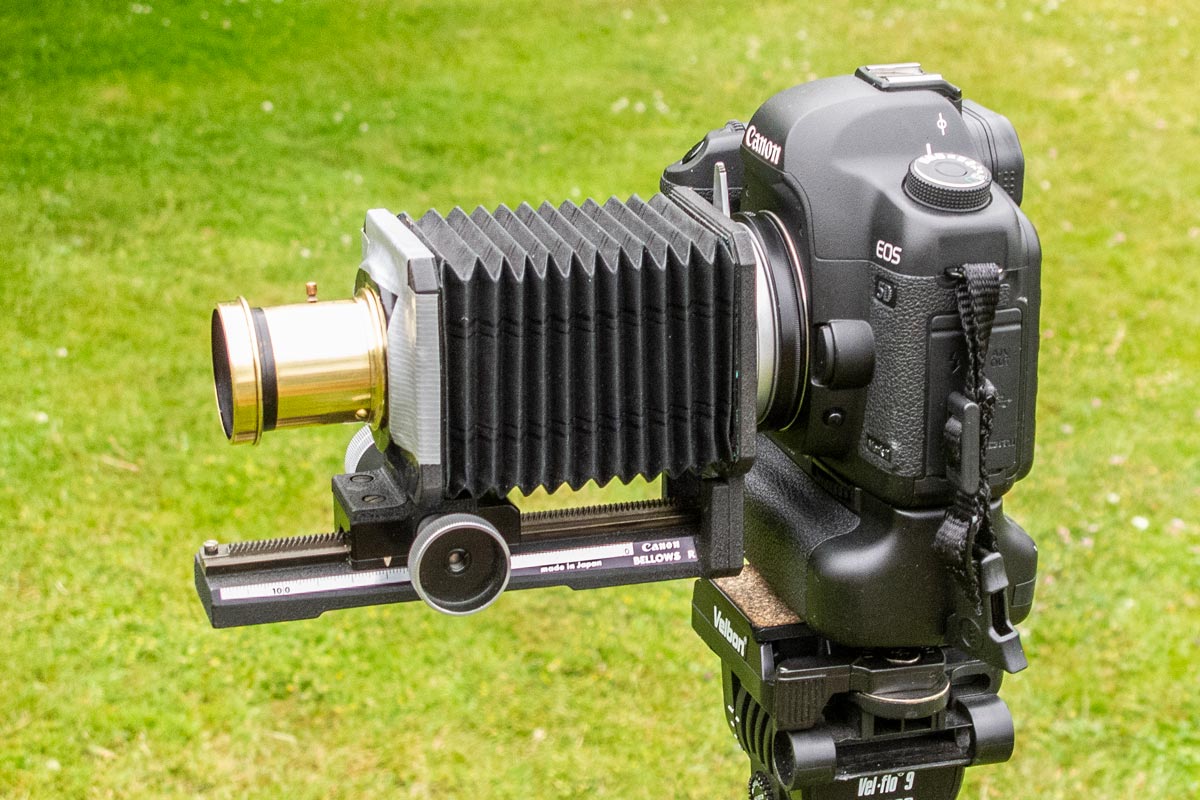
So how do we do that? Well, Canon,as usual, has the solution. I mounted my new brass lens on a Canon “R” Bellows using those two boons to modern civilization: black electrical tape and duct tape. The bellows then went on my 5D using an EOS-FD adapter. Neat, eh?
Now remember, this lens was designed for a large format camera, probably around 4×5 inches. Well, here we are sampling just a few inches in the very center of the image area for this lens. This is where the image will be its very best.
I took this setup outside and focused on a point source of light in the far distance. Actually the very far distance as I was focusing on Venus, the evening star. I then measured from the position of the iris in the lens to the film plane to get a rough idea of focal length. 160 mm, more or less, is what I got. Now this is not an accurate determination but close enough.
As I was trying to focus on Venus with the lens wide open I found that the image of the planet would not come to an accurate point. The focus was impossible to achieve because the point source would only reduce so far and then got bigger again. And it was an odd shape. But as I stopped the lens down, there was a substantial improvement, even stopping down from f/8, which is wide open, to f/16.

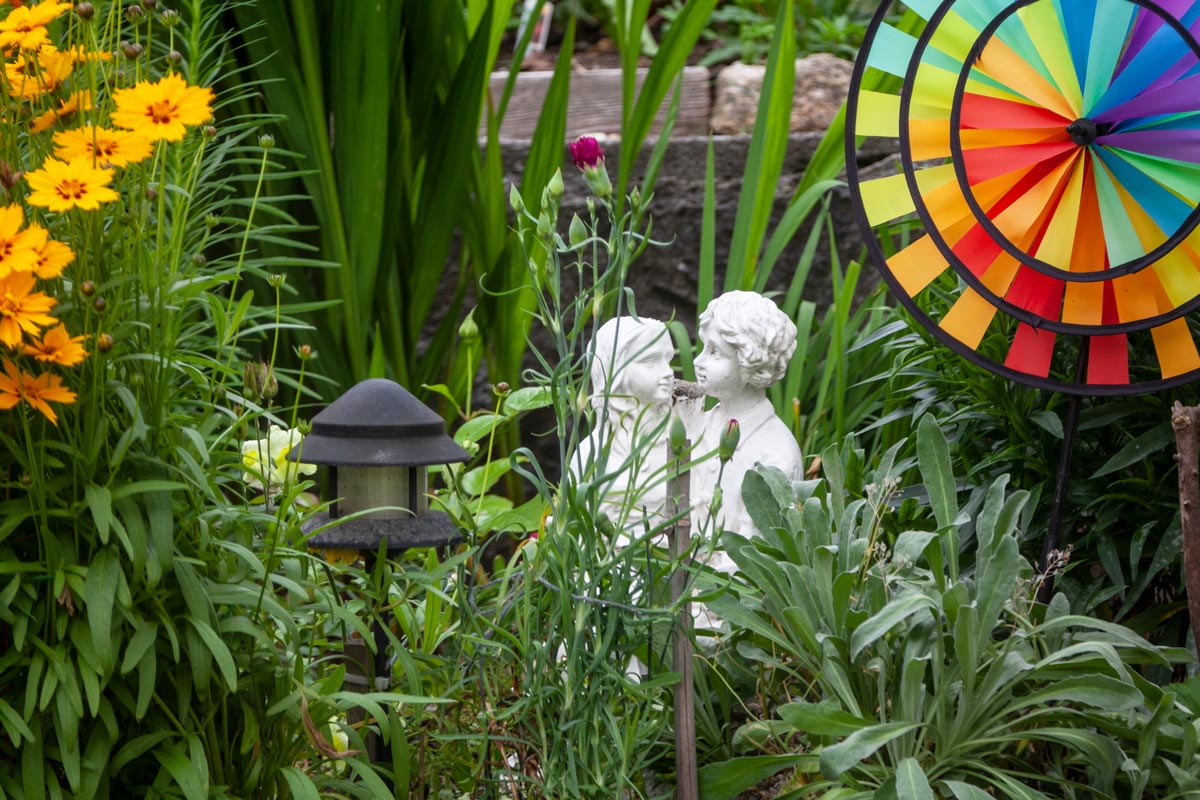
I set my camera up on the tripod with an interesting mix of subjects in the garden. These three images are all from the same setup. All I did was shoot at differed f/ stops. This first image was set wide open at f/8. The image on the left is the full frame. The image on the right is the center portion from the one on the left. You can see there is a definite bloom to the lens: the brightness spills into the darker areas and there is definite color fringing. Wide open, this is not the best lens I have seen.

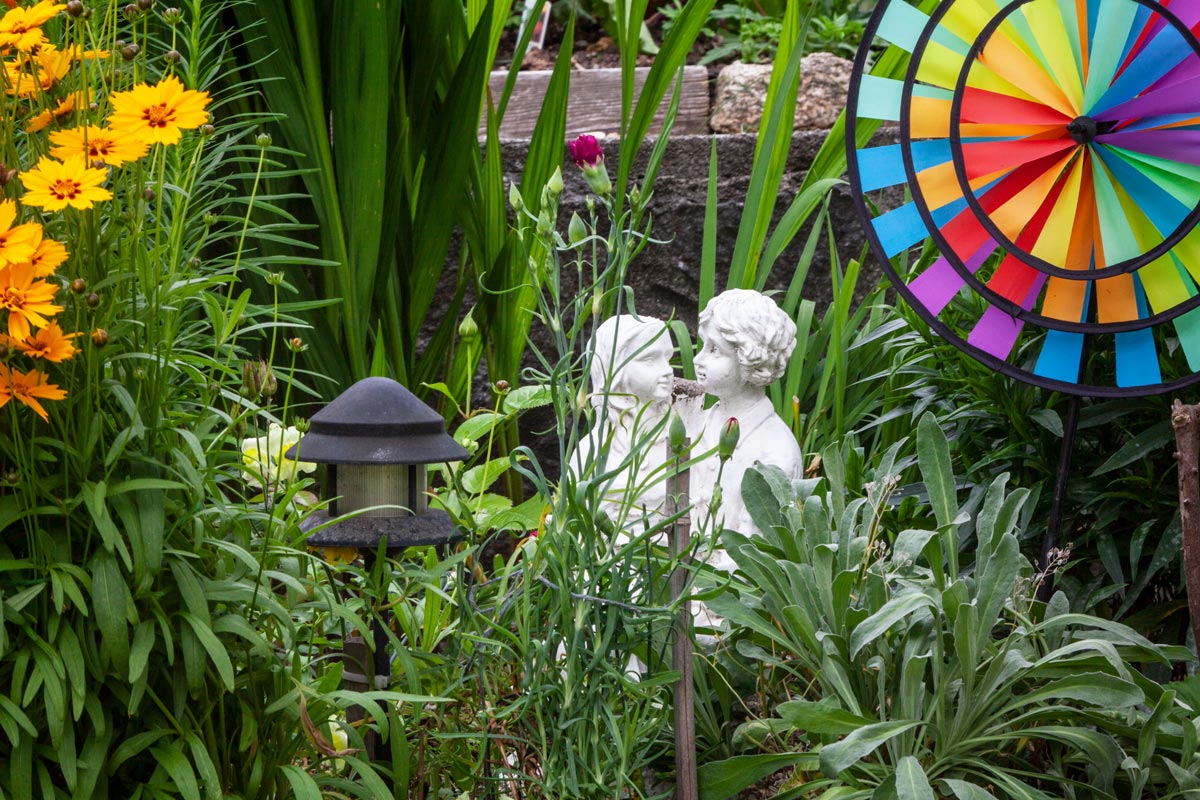
We have to remember that this lens will cover a 4×5 inch plate and we are sampling only a small part of the center of that image. The enlargement represented by the closeup on the right would represent a huge print from the full plate. This lens was made at a time when contact prints were the norm. Such prints would have looked incredibly sharp. This image is taken at f/11 and already the improvement is obvious. I think too that the improvement in depth of field helps the apparent sharpness of the image.
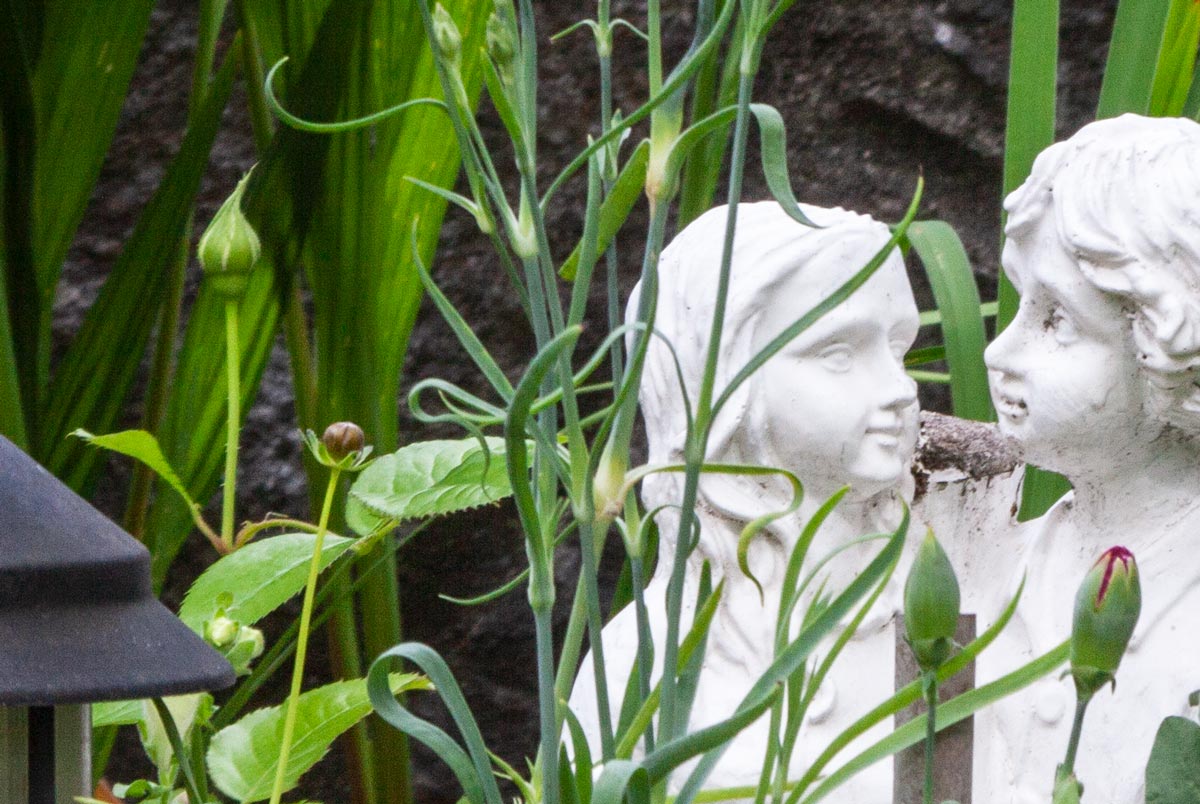
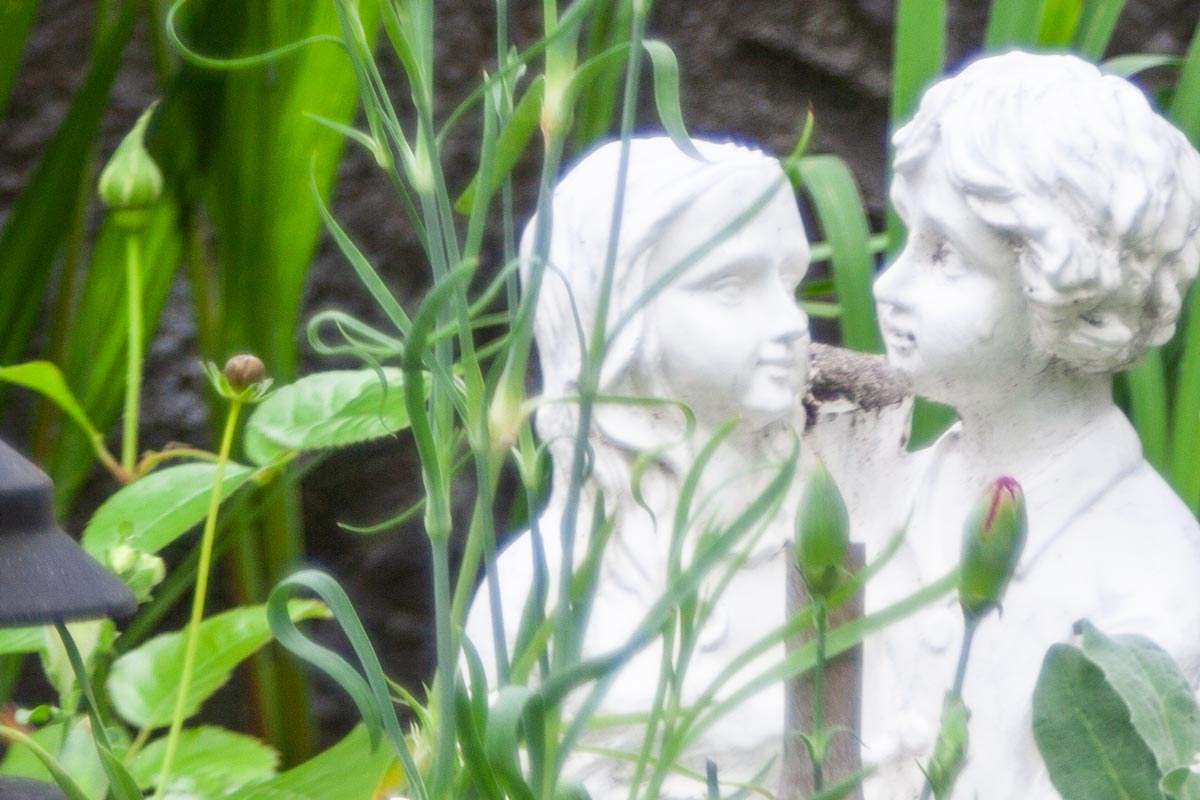
This final image is shot at f/22. Look at it carefully. This is a good image. Not razor sharp but it is pleasing. This lens improves dramatically as it is closed down. Shooting at these small apertures will require long exposures with a tripod. But from my reading I see that this type of lens was a favorite of landscape and architectural photographers. Long exposures pose no problem for this style of photography..

Tonight I leave you with one final image and a few thoughts. Above you can see that it is possible to take a pleasing picture with this lens. There is a pleasant softness to the image and I think on the right subject real art could be made with it.
It is amazing when you consider the state of the technology when this lens was made, sometime between 1860 and 1900. Because there are no identifying marks anywhere on the lens we will never have an actual date.
One last image, this time from “500 Cameras” book again. Look at the lens on this Folding Tailboard Camera from 1860. Does it look familiar? The author says that this camera was made by an unknown French manufacturer.
For its time, this lens was good technology and capable of fine photography. People of the day would have considered it quite the marvel. We have to be careful not to judge these old pieces by today’s standards. That is unfair and leads to inaccurate conclusions about quality.
In this lens one can see the struggle we still have with light, aperture and time. It was a balancing act full of compromise then and it still is.I look very forward to building my camera and getting into wet plate photography.
This hobby is a wonderful world for experiment and enquiry. I find it sad when I hear people question the value of shooting film at all. They miss the whole point: this is a hobby and adventure is what it is all about. And out of that sense of adventure comes creativity. The photographers of the 19th century were tinkerers, experimenters, craftsmen, and I know I would feel right at home with them.
