
Fig. 1 This Canon Model II D2 has attached to the shutter button a Canon Self-Timer II which will allow up to a 10 second delay in the shutter firing. The red circle on the arm rotates with the timing function giving a visual clue as to how long it is till the shutter releases, much like the flashing light on more modern cameras.
Canon Self-Timers
Almost as soon as the camera was invented photographers have wanted a way to put themselves in their pictures. This obviously involved a method of delaying the shutter release to give them time to get from behind the camera to in front of it. Many devices were tried including a bulb that created a pulse of air, a device that used a burning fuse, a string attached to the shutter release and on and on. In the early days there were many ways to release the shutter so there had to be many timing devices to work with them.
Germany at the end of the 1800’s was a center of photographic innovation in all aspects of photography. Around 1900 we find the first self timers. And since then over 100 patent applications for timing devices alone can be found.
In 1907 Carl Baser introduced his
“Knipsi” which was a burning fuse activated device that squeezed, after a delay, a pneumatic bulb to fire the shutter. “Knips” is colloquial usage from
the German verb “Knipsen” which means to snap or to take a picture. Adding an “i” gives us the diminutive Knipsi or “little snapper”.
By 1910 we find clockwork devices that could pull threads attached to shutter triggers. It was only when there started to be some standardization in shutter releases that the development of self timers began to standardize.
In 1909 Effwee, the company of Friedo Wiesenhavern and Heinrich Klapprott in Hamberg, Germany, came out with their “Effwee-Autoknips”. This was a clockwork mechanism that pulled a thread that was attached to the shutter lever on the camera. It was not widely adopted because there was no standardization in the way a shutter was triggered.
The first practical self timer was introduced by Wiesenhavern and Klapprott in 1923 under their trade name Haka which they called the “Autoknips II” This was a clockwork device that used a standard cable release to fire the shutter. This device quickly gained favour because cameras were standardizing cable releases for shutters. The Autoknips became the first universally practical self timer and it remained in production for many decades.


Fig. 2 The Autoknips II was a clockwork timer that used a standard cable release to attach to the camera shutter. The timer was wound by turning the red disk so that the pointer at the other end of the arm indicated the time delay.

Fig. 3 The Leitz APDOO Self Timer for the Leica Camera.
The rising popularity of these self timers did not go unnoticed by Leitz. Since about 1927 Leitz had used a threaded ring around the Leica shutter button onto which they screwed a bell shaped cup. It did not take long for the small companies making clockwork self timers to seize on this threaded collar as an attach point for their own third party timers on Leica cameras. The first of these appeared around 1930. Heinrich Klapprott came out with the Autoknipps III for Leica.
Finally, after more than three years in development, Leitz launched their own self timer, the APD00. As might be expected, it was a beautifully finished device that attached quickly to the threaded collar and worked flawlessly. It was introduced in 1938 and remained in the Leitz catalogue until about 1965. The time delay provided was about ten to fifteen seconds.
The clockwork self timer was a simple device and, driven by demand, dozens of small manufacturers sprang up in Japan in the 1930’s and 40’s producing knock-offs of German self timers. In 1933 Klapprott, unable to meet world wide demand, sold a production licence to Asanuma Shokai Co. Ltd., Japan’s oldest camera equipment manufacturer which they produced under their own “King” brand. Other companies followed suit, some getting licences to produce the Autoknips and some not. In 1935 Asanuma began producing the Autoknips II as the “King Selftimer II”
Prior to and during the Second World War Canon was in no position to create accessories for their new cameras and once the war was over their existence was tenuous at best. It was not until the end of the 1940’s that they finally began thinking of offering their own self timer.

Fig. 4 In the center of this image is the Shutter Button of a Canon Model IIB with the threaded collar around it.

Fig. 5 On the Model IIB you can unscrew the collar around the shutter button and screw the cup on the bottom of the Self Timer over the button.
Attaching the Timer
Since 1927 Leitz had placed a threaded collar around the shutter button on the Leica camera. Onto this they screwed a removable collar that protected it. But there was no hole in the shutter button for a shutter release cable. So how could one attach a remote release, and later a self timer, to this setup?
Look at the picture on the left. This is the shutter button on a Canon Model IIB. How do you attach a self-timer to this? The Timer has to attach in some manner so that the plunger that presses the shutter button down does not push it off the camera.
Well, the collar screws off revealing a thread below the button that a cable release or self timer could attach to.

Fig. 6 In this image the cup on the end of the Self Timer Model II has been screwed onto the threaded ring around the shutter button.
The bottom end of the self timer has a cup with a matching thread on the inside that slips on over the shutter button and screws onto the thread around the button. A plunger can then come down on the top of the button and depress it without pushing the mechanism off the camera.
The Model IIB was introduced in 1949, the same year as the Model I Self Timer. Users found a problem with this arrangement in that the collar once removed was easily lost which accounts for so many IIB cameras on the collector market missing them.
The next cameras from Canon, the Model 1950, which is now ultra rare, and the Model III and all subsequent Barnack style models changed the collar around the shutter button to a larger cup with a significant gap between the button and the body of the cup. With this cup there was room for the Self Timer to mount on the camera without removing the cup.

Fig. 7 In this Model IID2 camera the shutter button is surrounded by the upgraded collar with protective cup. Note the space between the button and the collar.

Fig. 8 The threaded mount around the IID2 shutter button is two threads, one for the collar and one smaller diameter one for the Self Timer.

Fig. 9 Self Timer Model III mounted on a Canon IIC inside the cup around the shutter button. Notice it was not necessary to remove the cup before mounting the timer.
This system worked well until the coming of the Canon Model Vt in April of 1956. The Vt was a revolutionary camera in many ways as Canon struggled against the popularity of the revolutionary Leica M3. Among other things that this camera had was an internal self timer so that the external Self Timer was no longer required.
This new camera had a new attachment method, often called a Compur Shutter Release, that was to become standard across the industry for many years as a means for attaching a shutter release cable: the hole with the tapered thread in the center of the shutter button.
So, after 1956, if you wanted to mount an external Canon Self-Timer you had to attach it by screwing it into this hole in the button. The Canon Self Timer Model 6 was designed with the tappered thread to fit into the Compur Shutter Release. Otherwise the operation of the Self-Timers was unchanged.
With the coming of the VT model in February of 1957 Self-Timers moved indoors and became an internal part of the camera. However, some cameras, such as the L1, L2 and L3, the Canonet, and others, had no internal timer and still required an external timer for a delayed shutter release, as we shall see.

Fig. 10 This is a Canon L1 camera with a Compur style shutter button with the tapered threaded hole for a cable release or an external Self Timer.

Fig. 11 The same L1 with a Canon Self Timer Model 6 with a Compur style tapered thread mounted in the shutter button.

Fig. 12 The Canon Self Timer Model I looks very much like the Autoknips Model I from which it was likely copied.

Fig. 13 The Canon Self Timer Model I did not have model designation anywhere on it.
As things began to settle down after the war and Canon began to see some camera sales they were able to turn their minds to creating accessories for their cameras to attract customers to a more versatile product.
In 1949 they came out with their first Self Timer. Records for the early accessories are very sketchy or don’t exist at all but by looking at the available price lists and instruction manuals and noticing the MIOJ marking 1949 is accepted as the date of the first Canon Self Timer appearing.
Also it is generally accepted that Canon did not manufacture the Model I, or the Model II, but sourced them from local Japanese shops who were already making self timers. They may have used more than one supplier which would explain small variations that can be found.

Fig. 14 The front flap of the Model I case is embossed with the Canon Eagle logo.

Fig. 15 The of the Model I case is embossed with the MIOJ mark but some may exist without it.

Fig. 16 This Model I Self Timer has no MIOJ marking. That mark was only required on products for export.

Fig. 17 The lever on the side of the Model I starts the timer countdown when moved in the direction of the arrow. But notice the three variations in design.

Fig. 18 This Model I has a spelling error that slipped through quality control. This is a rare variation. But look closer at the word Canon. The “C” has no serif which is part of the Canon logo. Compare to the picture on the row above on the right.

Fig. 19 Note the Semafor Arm in this image. Some Model I’s have a two sided nut attaching them but most have a six sided one. But look closer. The buttons on each end of the Arm on the left are shorter than the ones on the right.
There are very many slight variations among the Model I Self Timers. The text characters varied, the labeling was in different places, the start levers varied in design, the MIOJ was omitted on some but not others. These variations were fewer on the Model II and almost non-existent on the Model III and later. This may be a result of different manufacturers but one had to wonder at Canon’s quality control. This is probably a reflection of Canon’s preoccupation with the quality of their cameras. We will probably never know but it has created a bonanza for collectors who revel in variations.
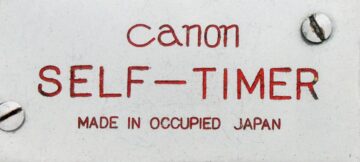
The “MIOJ”
When American troops landed in Japan in August of 1945 they faced a daunting task. They were vastly outnumbered by a population that had been training to rise up against an American invasion by every means possible. The Japanese military had admitted defeat but it was not known just how far the population would accept that.
Although it was to nominally be an Allied occupation in fact it fell to the Americans to govern the occupation of Japan until the occupation was ended by the Treaty of San Francisco which was signed on 8 September 1951. General Douglas McArthur was appointed Supreme Commander of the Allied Powers (SCAP) and he was in all but name the military ruler of Japan for the duration of the occupation.
Japan continued to be governed by the Japanese theselves, at least with respect to domestic matters, but militarily and with respect to foreign affairs they were under the direction of SCAP. Orders from McArthur’s office were directed to the Japanese governemnt by way of Instructions that came to be known as SCAPIN. Over the course of the occupation 2200 SCAPIN were issued along with 7000 administrative instructions known as SCAPIN-A.
For our purposes, have a look at SCAPIN 1535. Dated the 20th of February 1947 it required that all items for export be clearly marked, in English, with “Made in Occupied Japan”. Notice that the instruction is directed to the Imperial Japanese Government. Outwardly this was to be a Japanese government requirement but in fact it came from the American occupation forces.
This requirement was rescinded by SCAPIN 2061 which was dated the 5th of December 1949. I am sure that this requirement was odious in the eyes of the Japanese and they removed this statement from their products as quickly as they could. However, supplies of already manufactured product were used with the MIOJ mark into 1951 and occasionally later. However, the presence of this mark can be used to date products generally to the period February 1947 through December 1949.

Fig. 20
Outwardly the
Model II Self Timer is
identical to the Model I
and it operates in the
same manner. There appears
to be fewer variations with this
model and these are mainly in the
placement of the text.
The Self-Timer II appeared about six months after the Model I. Outwardly it seems to be identical to the Model I with the exception that it is clearly marked as the “Model II”. What differences exist internally is unknown. It operates exactly like the previous Model.
The signal arm is turned counter clockwise to the 12 o’clock position. It is held there by a catch on the side of the unit until the shooter is ready. Then the side lever is tripped and the countdown of about 10 seconds begins.
With the end of the MIOJ marking requirement Canon began marking their products as “Made in Japan” or simply “Japan”. The Model II also came in a leather case similar to the case for the Model I.

Fig. 25 This is the Instruction Sheet that came with the Model II Self Timer. These instructions apply also to the Model I Timer.
Another very subtle variation is on the Self Timer shown
with the MIOJ mark. It has four knurled sections on two
rings while the others have only three patterns on two rings.
This is not a complete summary of possible variations. One could build a whole collection of Model I and II timer variations. There may be others out there. Let me know, with pictures, if you find one and I will update this page to include it.

Fig. 21 Self Timer II with the word “Japan” denoting place of origin.

Fig. 23 Self Timer II with the word “Japan” in a differebt location.

Fig. 22 Self Timer II with the words “Made in Japan” denoting place of origin.

Fig. 24 A rare Self Timer II with the MIOJ Mark on the side of the Timer.

Fig. 26 This Canon Model II S2 has the Canon “Self-Timer” atached to the shutter button. The name on the timer is simply “Self-Timer” as all Model III’s were.

Fig. 27 The Model III Self Timer front and back. Note that the timer name appears nowhere on the timer. This timer was offered in a plastic pouch instead of the the Leather Case provided with the Models I and II.
The Canon Self Timers I and II did not look very …… well, did not look very Canonish. They were square, boxy, too shiny, and were obviously 1930’s technology. And they looked like many others on the market from varios companies.
In May 1955 Canon released its first true Canon designed Self Timer. It had a matte chrome finish and beveled edges like the cameras. It had a large dark green dial with a white arrow and a large white dot at the top.
This timer was designed for Barnack style cameras and it screws into the cup around the shutter button.
To operate the timer one simply rotated the green dial in the direction of the arrow: clockwise. The button on top pops up when you start winding. The white dot goes from the 12 o’clock position to about 7 o’clock. To start the timer you simply push the button on the top.
The length of time can be set by not winding all the way. From 7 o’clock the time is about 10 seconds, from 4 o’clock it is about 5 seconds.
The picture shows a bright green wheel but I have emphasised that in the photo. In fact, on my copy the green is very dark and can be mistaken for black in dim light.

The Canon Self Timer IV is discussed and argued about to no end by collectors but one thing is certain: no one has ever seen one. It appears that Canon missed this model designation and we have no idea how this happened. However, if you do find a Self Timer marked “Model IV” or simply “IV” you will have something unique in your hands.

Fig. 29 The Self Timer V is exactly like the Model III except for the large “V” on the front. There are very few variations of this model.

Fig. 30 When you wind the Self Timer the button on top pops up and the timer begins to run when that button is depressed.
Self Timer V was not so named for the V series of cameras. The first of the V series was released around April of 1956 but the Model V Self Timer did not appear until almost a year later, March of 1957. Not only that but the V series of cameras had internal self timers and so had no need of the Self Timer Model V. It is hard to escape the conclusion that the name simply describes the timer as being the fifth in line.
But there were three cameras that did not have internal self timers, the L2, L1 and L3. Well, actually the odd one can be found with self timers but they are rare outliers.
The L2 was the first one released in around March of 1957, the same month as the Self Timer V. The L cameras have the Compur threaded shutter button into which the Model V screws. Around the Compur tapered thread the Model V still retained a cup that looked like earlier models but it took no part in the actual mounting of the self timer.

Fig. 31 In this image the tapered Compur thread is visible with the shroud or cup surrounding it.

Fig. 32 This is the Instruction Sheet for the Model V Self Timer.

Fig. 33 This Canon Blue Demi has a shutter button with a Compur internal thread to accept a cable release or timer. Shown on the shutter button is the Canon Self-Timer 6.


Fig. 35 This Canon Blue Demi has a shutter button with a Compur internal thread to accept a cable release or timer. Shown on the shutter button is the Canon Self-Timer 6.

Fig. 37 Page 29 of the Dial 35 Instruction booklet recomending the Canon Self Timer 6 and showing how the Release Adapter is to be used.
Canon introduced the half frame Demi cameras, the Canonex and the Dail 35 in 1963 and required a new Self Timer for them. They sourced the new timer from an external supplier calling it the Model 6. It attached to the camera using the Compur tapered thread .
This self timer went back to the semaphore arm style of the Models I and II. It also operated in the same manner. The shutter delay was started by pressing a button on the side of the body.
The Model 6 was the first of the Canon Self Timers to be named with the use of aa Arabic numeral instead of a Roman one. It was sold with a plastic case like the Models III and V.

Fig. 34 A side view of the Model 6 with the Plastic case that came with it in the background.
The Model 6 was an accessory that had its own accessory: the Release Adapter. The Canon Dial 35 camera’s shutter button was on the front of the camera beside the lens. If the recommended Self Timer, the Model 6, was used it stuck sraight out from the front of the camera and actually appeared in the image.
The Release Adapter was short extension that screwed into the shutter button but it was inflexible and had about a 30 degree bend in it. The Self Timer was screwed into it but the device held it at an angle out of the picture.
This arrangement is shown on page 29 of the Dial 35 Instructions which is shown below and to the left.

Fig. 36 The Canon Release Adapter and the box it came in. The left end screws into the camera shutter button and the Model 6 screws into the right end.

Fig. 38 This is the Canonet QL 25 with the Self Timer 7 screwed into the Compur style shutter button.

Fig. 41 This is page 21 of the Canonet QL 25 User Manual which lists the Self-Timer 7. Notice the admonition to use “Exclusively” with the QL 25!
In October 1965 Canon introduced the Canonet QL 25 to their “Point and Shoot” lineup. This was the lowest priced entry into the Canonet series and several changes and omissions to reduce production costs created a camera with a very heavy trigger. So much so that a strengthened Self Timer was required. This
was the Self Timer Model 7.
This timer looked very much like the Model 6 and operated
in exactly the same way but apparently the plunger acted
with more force. The Instructions for the Canonet QL 25 list
the Self Timer 7 as an accessory with the admonition
“Exclusively use with the Canonet QL 25.”
This is an interesting comment in the QL 25 booklet. It seems
to be a warning about this timer. I can’t find a specific instruction
not to use it on other cameras, but, I think caution is the
wisest course. This timer is probably best left to the QL 25.

Fig. 39
Like the Model 6,
the Model 7 is started by
the red button on the side. Notice the cup screwed
onto the Compur style tapered thread. One wonders at it’s purpose.
Fig. 40 This image of the back of the Model 7 shows the Compur tapered thread without the cup shown above attached to it. The QL 25 does not
require such a cup and if we are not going
to use it on other cameras what
is it for?


Fig. 42 Here the Timer 8 is shown on a Canon 110ED

Fig. 44 Click here is read the User Instructions that came with the Model 8.
The last of Canon’s mechanical Self Timers was the Model 8. It looked very much like the Models 6 and 7 and operated in the same way. Available from 1970 until 1985 it is listed as an accessory in the Canonet 28 User Instructions , introduced in March of 1971. It also appears in the Instructions for the Datematic, introduced in November 1974, and the 110E and 110ED, introduced in March 1975.
The User Instructions for this timer point out that on the shaft
of the Model 8 is a collar and lock nut which work together
to control the length of the firing pin’s stroke which can
be set lengths from 2 mm to 9mm. The recommended way
to set the length is to make it as short as possible and then
through trial and error increase the length until the shutter
just fires reliably.


Fig. 43 The front and back of the Self Timer Model 8. As with the Model 6 and 7 the timers is started by pressing the button on the side of the case.
And finally ….
Peter Kitchingman prepared a chart summarizing this data for the rangefinder cameras which is up to the Model V. I have added the Self Timers that came after the rangefinder cameras and added a few columns for easy reference.

Acknowledgements:
This page describing Canon Self Timers was co-written with Peter Kitchingman who provided notes and photographs from his own personal collection. The writing and layout may be mine but the knowledge is his.
One other source that I rely on heavily is the Canon Historical Society group on Facebook. If you are interested in collecting Canon cameras you have to follow this group. It was here that I got the image of the Canon Release Adapter. Thank you Carlos Snap!
This website is the work of R. Flynn Marr who is solely responsible for its contents which are subject to his claim of copyright. User Manuals, Brochures and Advertising Materials of Canon and other manufacturers available on this site are subject to the copyright claims and are the property of Canon and other manufacturers and they are offered here for personal use only. Use of this website is governed by the Terms of Service set out on the page by that name.

The True North Strong and Free